# HOME
Introduction
I am a UK-based network consultant with a passion for learning about anything technology based. I mainly focus on large enterprise technologies, however I also like to keep myself grounded with SMB technologies because not all companies want (or can afford) an all-signing-all-dancing solution to their problems.
I have a long history working with networking technologies such as Aruba, Cisco, FortiGate, Juniper, Palo Alto, and with Microsoft cloud technologies such as Azure, Entra, Office 365, and on-prem technolgies including Active Directory and SCCM. I've also dabbled in a bit of Citrix and numerous other infrastructure technologies.
I enjoy building my homelab which consists of an Unraid NAS running various docker containers, and a two-node Proxmox cluster hosting VMs and LXC containers. I purchased some Unifi network equipment to host the networking side and allow me to expand my learning.
This is a dumping ground for my thoughts and findings. I don't know if there will ever be any order to the documents, I'll post things which I find useful as I find them and will try to organise them as best as I can.
# Azure Point to Site tcp issues
I was approached with a weird issue where a client on the Azure Point-to-Site (P2S) VPN, connecting to an Azure Virtual Gateway, wouldn’t open SMB file shares from the on-prem network.
Rough topology:
* Azure Virtual Gateway in UK South
* Site to Site configured with On-prem firewall
* Point to Site configured to allow clients to connect using Azure AD
* PC1 with Azure VPN Client installed & all services working fine
* PC2 with Azure VPN Client installed & some services are not working
Noticed behavior:
* PC1 could connect to the Azure P2S
* PC1 could ping the SMB file server on-prem
* PC1 could connect to the SMB shares on-prem in Explorer
* PC2 could connect to the Azure P2S
* PC1 could ping the SMB file server on-prem
* PC1 could NOT connect to the SMB shares on-prem in Explorer
### Troubleshooting
#### On-Prem firewall
We started taking Wireshark captures on the On-Prem firewall thinking it was a firewall issue.
On the on-prem firewall we could see the traffic coming in for:
* PC1 - DNS, ICMP and SMB traffic, and confirmed that PC was working normally
* PC2 - only DNS and ICMP traffic - no SMB traffic!
At this point we knew the client was connecting successfully to devices on-prem because DNS and ICMP were working (DNS was resolving and pings were being returned). However SMB traffic still wasn’t working for PC2.
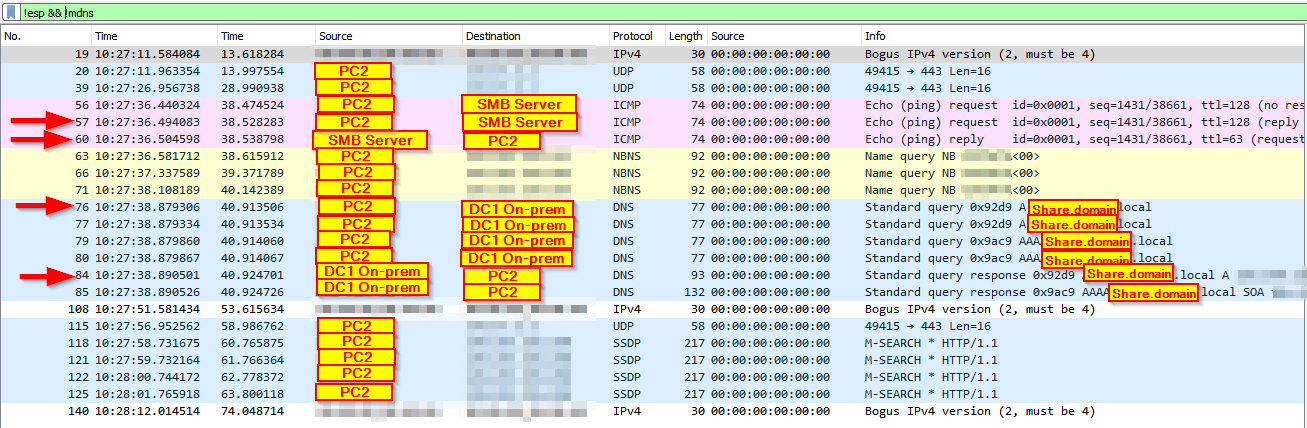
I found the following packets to be interesting:
* 57 ICMP / ping request from PC2 to on-prem SMB server
* 60 ICMP reply from on-prem SMB server to PC2
* 76 DNS request for A record for smbserver.domain.local
* 84 DNS reply for A record for smbserver.domain.local
What’s missing - SMB traffic.
On-Prem Firewall Wireshark
We also took traces on the Azure Virtual Network Gateway - however found the information to be the same, we weren’t seeing SMB traffic from PC2 but were seeing other types of traffic being allowed.
At this point we were sure there was an issue with the client not sending the data:
* We checked the Windows firewall to ensure that SMB traffic was allowed out (and found nothing)
* We checked for any other firewalls on the client (and found nothing)
### Penny drops
We Wiresharked the PC2 (the not working PC) to see what was happening, we traced the Azure VPN interface first (not the LAN port) - and the trace we took looked pretty much like the one on the on-prem firewall, DNS and ICMP - no SMB traffic.
We ran another trace on PC2 but this time on the LAN port - we saw all the SMB requests going out of the LAN port, not down the Azure P2S VPN port.
We then realise that it’s only TCP traffic that’s being dropped, ICMP (not TCP) and DNS (not TCP) were allowed out and was getting to the intended target. So we questioned the knower of all. Google.
### Resolution
We got one hit back
The last comment gave us the answer.
“The problem was caused by the Dell Optimiser SW that came pre-installed on out laptops, but it only affected users that did NOT have local administrator rights. Uninstalling the SW fixed the issue for all our endpoints.”
The reason it worked on PC1 and not PC2 was because PC1 didn’t have the DELL Optimiser software installed. We removed that and after a reboot the client was able to connect to the file share via the Azure VPN!
# Creating an Azure CloudShell
I wanted to create a post to show how to setup a Cloud Shell for the first time, and also a few considerations about doing so because you normally only do this process once for your account.
You can access the Cloud Shell in two ways:
* Direct link: Open a browser to .
* Azure portal: Select the Cloud Shell icon on the Azure portal.
#### Considerations
* When creating a Cloud Shell you’ll only need to do this once per account (usually)
* Create your Cloud Shell in a management resource group
* Create a storage account specifically for Cloud Shells
### Steps
* Open a Cloud Shell
Locate the Shell Icon
* Select PowerShell to get started (you can change it later)
Select PowerShell
* You will be told you have no storage selected. Click “Show advanced Settings”
Advanced Settings
* Populate the fields
* **Subscription**
* The Azure subscription you’re creating the Cloud Shell resource under
* If you have more than one; select a subscription which will contain other centralised management resources
* **Cloud Shell Region**
* The region you’d like to deploy the Cloud Shell resources to
* Pick one closest to you as an example
* **Show vNet isolation settings**
* Allows the cloud shell to access virtual machines and other resources behind a firewall or using private addresses within Azure.
* Leave unchecked
* **Resource Group**
* The resource group the Cloud Shell will be associated with
* If you have more than one, select a resource group that is used for management (or create a new one one)
* **Storage Account**
* The storage account the Shell will store any files generated
* I create a new Storage Account specifically for Shells to group them all together
* Remember the name has to the lower case, between 3 and 24 chars and be globally unique
* **File Share**
* This will be the file share where the Cloud Shell data will be stored, within an IMG file
* I often call the name of the fileshare my username (in case I wanted to use this storage account for more than one user in the future)
Populate the Fields
* You will then be presented with a Cloud Shell running in PowerShell. You can easily flick between the BASH shell by changing shells in the top left corner
### Links
*
[Azure](https://blog.tomwhiteley.com/categories/azure/)
# Deploying a Virtual Machine to Azure using Bicep and CloudShell
I wanted to document an easy example to show how to use Bicep and deploy something simple.
I’ve tried to simplify the steps from the MS Guide and included steps for deploying using the Cloud Shell. Of course this is possible via PowerShell on a local machine but avoids those additional steps to focus on Bicep and the output it generates.
### Steps
You will need a Cloud Shell. If you don’t have one already then set one up using [this guide](https://blog.tomwhiteley.com/posts/creating-azure-cloudshell/)
Create a folder in your CloudShell called bicep. Move into that folder.
```powershell
mkdir bicep
cd bicep
```
Create a new file in that folder called vm.bicep
```powershell
echo "x" > vm.bicep
```
Open the file in VS Code within the CloudShell
```powershell
code vm.bicep
```
Copy the following code from my Github repo into the bicep file. Use the raw version to avoid any formatting issues!
*
Look at the file’s properties - it’s going to create
* The parameters at the top allows the Bicep file to be called with parameters. In most cases there are defaults for each parameter (so check these are ok for you before you deploy it).
* There are variables - these cannot be overridden from outside of the Bicep file, they can be changed to Parameters though if you want to pass them in like that.
* It’s then going to create the resources
* Storage account for Boot diags
* PIP
* NSG
* VNET & Subnet
* NIC
* VM
* Finally there is then an output in the Bicep file which outputs the generated DNS record for the VM.
Make sure you’re happy with the AZ Context of the shell (which sub it’ll deploy into if you have more than one)
```powershell
#Get current context
Get-AzContext | Select-Object -Property Name, Subscription, Tenant | Format-List
#Get the subscriptions in your account
Get-AzSubscription | Select-Object -Property Id, Name, TenantId | Format-List
#Set the subscription if you want to change it (enter a valid Sub ID)
Set-AzContext -SubscriptionId 22222222-2222-4000-22222222222222222
```
Deploy the a resource group through the CloudShell
```powershell
New-AzResourceGroup -Name exampleRG -Location "East US"
```
Deploy the Bicep file into that Resource Group - notice the parameters I’ve used. In my subscription I have a policy against deploying D series VMs in my Azure so I need to override to deploy a B series one, this parameter matches the ones in the file above.
```powershell
New-AzResourceGroupDeployment -ResourceGroupName exampleRG -TemplateFile ./vm.bicep -adminUsername "tom" -vmSize "Standard_B2s"
#You will be prompted for a Password after you hit enter
```
While the VM is deploying, go to the Azure Resource Group and click Deployments - notice the deployment is in progress.
Once the powershell has completed you will be given the output of the DNS name (as this is specified as an output in the Bicep file). RDP to that DNS entry and logon with the credentials you have used.
{% hint style="danger" %}
Once you have completed the testing, don’t forget to `delete the resources` you have created, or `delete the resource group` containing all the resources.
{% endhint %}
## Homework
Once you’ve completed the deployment above maybe try the additional steps
* Change the size of the VM to *Standard\_B2ms* on the command and rerun the command.
* Remove the VMsize on the command line and change the default in the vm.bicep file, and rerun the command.
* Delete the VM and redeploy the VM with a different type of OS - don’t forget about the limit imposed by the bicep file. This could be done in two ways, via the command line as a parameter, or as the default value in the bicep file.
## Links
# CloudFlare Tunnels
Content coming soon